Pages

Friday, July 29, 2011

Cooking Tips, Part 1: What is a "Pinch"?

Well, hello there!

I am going to be doing a series of cooking tips because they keep popping in my head and while I am far from being an expert, I do have a little bit of knowledge and I feel I should share.

This first part of the series will answer the eternal question: how much is a "pinch"? It is, in fact, a deceptive term. Now, don't let anyone ever tell you that television isn't educational because I have watched my fair share of cooking shows and I have learned something that has changed the way I cook: a pinch does not literally mean a pinch! A pinch is more of a small handful.

Allow me to demonstrate.

This is not a pinch!

This is a pinch!

I hope this has been of use to you!

Thursday, July 28, 2011

Orange chicken

Wow. People actually view my blog now. It's craziness. I probably won't win any awards or anything, but in my books 240(ish) views is a lot! Naturally, as soon as the numbers jump I have to study for my French midterm and I abandon my legions of adoring fans for... well, for far too long, in any case!

So, as a reward for your patience, I am going to give you a real treat: orange chicken! It's a Chinese takeout favourite of mine and it is notoriously hard to get a good recipe for it! Everyone wants "authentic" orange chicken. Not me, no sir! I want the crispy, deep-fried, drenched in orange sauce kind that you get from the good takeout places. So, here goes nothing!

I adapted this recipe from this website, which has lots of Chinese takeout recipes. Now, you could just go to that website and get the recipe there, but mine has a little something extra, plus there are no pictures over there. Not cool. There is also a video, but she makes it look deceptively easy. Also not cool.

You will need the following ingredients for this recipe:

Stir-fry:
-1.5lbs chicken breast (~3 breasts)
-2 large green onions
-2 carrots
-Peanut oil, for frying

Sauce:
1½ cups orange juice (preferably fresh squeezed, but it does not have to be!)
-¼ cup brown sugar
-2Tbsp soy sauce
-1Tbsp chili garlic sauce
-2Tbsp cornstarch

Chicken Coating:
-
1 cup cornstarch
-1 cup flour
-2 eggs

The instructions can get a little tricky, so please be careful to read the recipe thoroughly.

Start by cutting your chicken into 1-inch chunks. If this sort of thing is difficult, I like to try and think of the size of orange chicken pieces when I get takeout.

Then cut the carrots and green onions (green AND white parts) into thin slices. Don't worry if you don't have quite as many green onions as I do in the picture. I bought mine from the Hutterites at the Farmers' Market and they grow some really big green onions!

Set the chicken and veggies aside.

Mix together all the ingredients for the sauce except the cornstarch (orange juice, brown sugar, soy sauce, chili garlic sauce, ginger).

Mix the cornstarch for the sauce (the 2Tbsp portion) with a little water, just until it dissolves.

We'll now be talking about the ingredients for the chicken coating.

Beat the two eggs and put them in a bowl.

The next phase will be easiest if you set up a little station for yourself: one bowl of flour, one bowl of beaten eggs and one bowl of cornstarch. Next to your little station have a place to put the raw, coated chicken pieces.

Take each piece of chicken and dip it first in flour, then in egg, then in cornstarch and set aside. I recommend changing hands between the egg and cornstarch otherwise you'll get a ton of buildup on your fingers.

Your chicken will look something like this:


Heat up 2-3 cups of peanut oil in a wok. Take the coated pieces of chicken and deep fry them in the oil. Do not over-crowd the wok. I put about ten pieces of chicken in at a time. Deep fry them for five to six minutes, until golden and crispy. They should look like this when you're through:

Drain the chicken on a paper towel as I have done.

Remove your oil from the wok. Unless it is already old or it looks dirty, your oil can be saved and reused a couple of times before you discard it.

Wipe out the wok and add the sauce mixture to it and bring it to a boil. Add in the cornstarch and water mixture. It will begin to thicken right away, so stir thoroughly to avoid getting lumps in the sauce.

Stir until thick. This does not take long at all.

Add the chicken to the wok and coat well with the mixture. Then add in the carrots and onions. If you want your carrots to be cooked, I suggest steaming them beforehand. I, myself, like the crunch.

The chicken should already be cooked from the keep frying, so don't worry about leaving it in the wok for any amount of time. Just let it soak up the flavour and you're good to go!

This dish is super-yummy served with rice.


Enjoy!

THIS RECIPE IS:


~~~~
Boring version of recipe instructions:

Cut chicken into 1-inch chunks and slice carrots and green onions thinly. Mix together all sauce ingredients except cornstarch and set aside. The sauce's portion of the cornstarch should be mixed together with a little water until dissolved. Beat eggs. Dip each piece of chicken in flour, then egg, then cornstarch (chicken coating portion). Heat 2-3 cups peanut oil in wok. Deep fry chicken in batches for about 6 minutes. Drain chicken. Remove oil from wok and wipe out wok. Add sauce to wok and bring to a boil. Add in cornstarch and water mixture and stir until thick. Add chicken and coat well. Add carrots and onions and coat well. Serve with rice.

Wednesday, July 20, 2011

Tilapia with Avocado, Tomato and Mango Salsa

The recipe was inspired by this salsa recipe, but I definitely feel the changes I made make a difference. When I get to the changes in the recipe, I'll let you know and walk you through it.

You will need the following ingredients for this recipe:

-1 large mango, diced
-1 large avocado, diced
-4 medium tomatoes, diced
-1 jalapeño, seeded and minced (or more, for a spicier salsa)
-1/2cup fresh cilantro, chopped
-3 cloves garlic, minced
-3/4tsp salt
-2Tbsp fresh lime juice
-1/4cup red onion, chopped
-3Tbsp vegetable oil
-2 tilapia filets
-1Tbsp vegetable oil

First, I would like to advise you as to how to cut up the avocado and mango.

To cut up an avocado, cut it in half around the pit and twist the halves in different directions to separate. To remove the pit, strike it with a sharp knife (carefully!) and rotate the knife so that the pit comes out. Then slice the avocado into quarters and peel. Then slice it however you want - diced, for this recipe.

As for a mango, I strongly recommend against searching "how to cut up a mango" on Chef Google because unless you're an expert, my way is more efficient. The secret: peel the mango first! Then slice off chunks of the mango and dice them. This way you can get right to the core.

So after you have done all of that, please combine the mango, avocado, tomatoes, jalapeño, cilantro and garlic in a bowl. Mix them up well.

Next, dice up the red onion . Add the salt, lime juice and red onion to the bowl.
Yummy ingredients...

...make for the most delicious
salsa you'll ever taste!
In the original recipe, it calls for 1 full teaspoon of salt. I recommend 3/4tsp, however, because while I found the salsa satisfying on the fist, it was entirely too salty to be eaten with chips later. So, I recommend you reduce the salt by enough to make it palatable with salted tortilla chips but not so much that you lose the flavour.

Finally, stir in the 3Tbsp oil. Here I recommend vegetable oil rather than olive oil because olive oil has a very distinctive flavour, and, while I love the flavour of olive oil, this recipe is soooooo not about olive oil. The purpose of the oil is purely consistency-related. In fac

Stick the salsa in the fridge for at least 30 minutes (another reason not to use olive oil - it clouds and can partially solidify in the fridge!). In the mean time take your tilapia filets and fry them in the 1Tbsp oil.

Once the tilapia is cooked, serve with rice and top with the salsa! It is a perfect and delicious summer dish that you will not be sorry you made!

Enjoy!

THIS RECIPE IS:


~~~~
Boring version of recipe instructions:

Combine mango, avocado, tomatoes, jalapeños, cilantro and garlic. Add in salt, lime juice, red onion and oil. Refrigerate at least 30 minutes. Pan fry tilapia in 1Tbsp oil. Serve topped with salsa.

Sunday, July 17, 2011

Yummy Stir Fry

About a year and a half to two years ago, my husband kept bugging me to make stir fry. However, I was pregnant and in no mood for stir fry because stir fry is boring.

Then my baby was born and my dad and step-mom came to visit. One evening, they made stir fry for me and my husband and it was delicious. Ever since, this general stir fry recipe has been a regular dish in our house.

Keep in mind that stir fry is very versatile and if any of these vegetables sound unappealing, just leave them out.

You will need the following ingredients for this recipe:

-2 chicken breasts
-3Tbsp vegetable oil
-2 cloves garlic
-2 medium carrots
-1 red or orange bell pepper
-2 small heads of broccoli (or 1 large)
-Top 1/4 of a leek
-2 small onions
-1 zucchini
-About 1 half a 300mL bottle of spicy Szechuan sauce or stir fry sauce of your preference
-3/4cup uncooked rice

Trim fat from chicken breasts and chop them into chunks. Size doesn't really matter - it's your preference.

In 1Tbsp of the vegetable oil, stir fry the chicken in a wok until it's white on the outside, like you did with the Herbed Chicken recipe.

In the mean time, prepare the vegetables. Again, I never ever... okay, I very rarely use fresh garlic because it is a royal pain in the you-know-where. I use jarred. If you do use fresh, peel it and mince it up, preferably with a santoku knife. Peel and slice the carrots into thin disks. Seed and thinly slice the red pepper. Chop off the top of the broccoli and slice it into small florets. Cut off the top 1/4 of a leek and thinly slice it into stalks. Chop the onion. Halve the zucchini and chop. Actually this is all made easier with a santoku knife. If you don't have one, I recommend you invest.

Once your chicken is white on the outsides (it does not need to be cooked through yet), add the vegetables and the rest of the vegetable oil and mix well with the chicken.
"Asian Family": the good brand!!
Mix together the vegetables and chicken well. Once the vegetables and chicken are well-combined, add the Szechuan sauce. By the way, when you are buying your spicy Szechuan sauce, you will be much happier buying a good, expensive kind and I'll tell you why. Once, when we were short on cash but craving stir fry, we bought this other kind of Szechuan sauce. Also a name brand, yes, but it was a larger bottle for less money: a no-brainer!... or so we thought! Alas, when we attempted a stir fry with this alternate brand, all it did was turn our chicken pink and make our vegetables bitter. Not a good experience.

So, once you add your good brand of Szechuan (or other stir fry) sauce, mix up the vegetables again and let them cook. In the mean time, get your rice cooking. Remember: 1.5 cups of water for 3/4 cups of uncooked rice. Once your vegetables are well cooked and looking like this:


you may add the rice and stir it up so that it looks like this:

Serve it right away so it's very hot. The carrots will be quite firm still, but I like them this way.

Enjoy!
Makes good leftovers for babies too!

THIS RECIPE IS:


~~~~
Boring version of recipe instructions:

Trim fat and cut up chicken into chunks. Cook in wok until white on all sides in 1Tbsp of vegetable oil. Prepare vegetables and add to wok along with remaining oil. Add Szechuan sauce. Stir well. Add cooked rice and mix. Serve hot. Carrots will be firm.

Friday, July 15, 2011

Broiled Chicken with Oil, Lemon and Garlic Sauce

This recipe is really simple. You'll need to prepare it in advance since the chicken needs to be marinated, and - yes - it definitely makes a difference. My recipe is for two people, but feel free to double, triple, etc the recipe as needed.

You will need the following ingredients:

-2 chicken breasts
-Salt and pepper
-4 cloves crushed garlic
-1/4cup lemon juice
-3Tbsp olive oil
-1 Tbsp chopped parsley

Trim fat from chicken breasts and season with salt and pepper.

It usually takes me 1.5 lemons to get a quarter cup of juice, but I'm not very good at squeezing lemons. Also, I almost always use jarred garlic, no matter how the recipe says it should be cut up.

Mix together garlic, lemon juice, oil and parsley.

Coat chicken with the mixture and marinate at least one hour. If the mixture doesn't cover both sides of the chicken breasts, turn them halfway through marinating.

Broil the chicken breasts on high for 10 minutes, then flip them over and broil 10 minutes on the other side. Baste often! If you remember to baste, the chicken will have a really, really amazing flavour.


And that's it! I made white rice and steamed vegetables to go with and it was really, really delicious.


Enjoy!

THIS RECIPE IS:


~~~~
Boring version of recipe instructions:

Trim fat and season chicken with salt and pepper. Mix together garlic, lemon juice, olive oil and parsley. Coat chicken and marinate at least 1 hour. Broil on high 10 minutes on each side, basting often.

Monday, July 11, 2011

Thai Beef Salad

My Thai beef salad recipe is super yummy and adapted from this recipe, with one big change to the recipe and with specifications to the salad. Also, I always double the recipe.

In order to make this recipe you will need the following ingredients:


For marinating:

-
1lb lean beef
-2Tbsp soy sauce
-1 clove crushed garlic

For the dressing:

-
1tsp garlic
-1tsp chili
-1tsp ginger
-4Tbsp lime juice
-4Tbsp sweet chili sauce
-4tsp soy sauce
-2tsp sugar
-4Tbsp chopped cilantro (coriander)

For the salad:

-
1 small head red lettuce
-2 small, ripe tomatoes
-2/3 to 3/4cups uncooked rice


I prefer to chop up the beef into about 1-inch chunks. It makes it easier and it makes the marinade more effective.

Marinate the beef in the garlic and soy sauce for at least three hours. At least three hours is better and gives a better flavour, but if you forget, as long as you can get will be good.

This recipe is all about the salad dressing. It it what makes this recipe delicious. The best thing is that it's ridiculously easy. Just combine all ingredients and mix it up. The garlic, chili and ginger can be fresh, jarred, or dry. It's delicious, no matter what.


Ingredients before...


Ingredients after!


For the salad, take the head of lettuce and chop it very thinly, almost as though it were shredded. Cut the tomatoes into very thin slices. Cook the rice. Remember: twice the amount of water to the amount of rice you have (so 1.5 cups water for 3/4cup rice). Combine all ingredients and mix well.

Now, cooking the beef is a little more tricky, at least for people who aren't very confident in cooking meat, such as myself.

If you prefer to have the meat more well-done, cook it to your desired temperature, but this recipe is best done with the beef just seared. For my Jewish friends, the beef is not salted before cooking, so to remove as much blood as possible, rinse and drain repeatedly after the beef is cut into smaller chunks. If marinating in soy sauce counts as salting, a Kosher alternative would be to skip marinating and add the soy sauce and garlic mixture after the beef is slightly browned on the outside and let it stir fry for a minute or two. There is no reason for my Jewish brothers and sisters to not experience this delicious recipe!

Now that we're all on the same page, heat up a frying pan (or wok for the Kosher alternative) to a medium-high heat. Do not add any oil or butter. Just put the meat on the pan, one piece at a time.


Now, once I finished adding the beef, I immediately went to the first piece I put on and turned it over, then went through them and turned each of the pieces over one by one.


Then I take them all out one by one, in the approximate order I turned them. The only thing is you want to make sure they're browned on all sides. If there are a few that aren't, just turn them on the offending side for about 30 seconds.

If you cooked the beef in a wok, just toss it, until sufficiently browned.

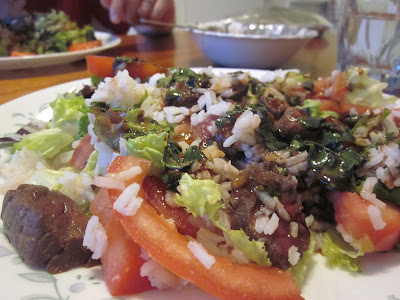
The beef should be very soft. Slice it into very thin slices and add to the salad. The beef should be very pink in the middle. I highly recommend snitching a few slices. They are very delicious.

Stir up the salad very well. You can either pour the dressing over it or mix it into the salad itself. Either way, it is extremely tasty.

Enjoy!

THIS RECIPE IS:


~~~~
Boring version of recipe instructions:

Marinate beef for at least three hours. Thinly slice lettuce and tomatoes, cook the rice and combine with lettuce and tomatoes. Mix. Combine all salad dressing ingredients. Set aside. Sear beef on all side over medium-high heat without oil or butter. Slice beef thinly. Add over salad. Mix salad well. Serve dressing over salad.

Thursday, July 7, 2011

Easy Shish Kebabs

Shish kebabs are my absolute favourite summer dinner. Grilled onions are some of the best things I've ever tasted and... well, I like it all. And I have a recipe from my dad for you that makes shish kebabs easy to do on a busy day or on short notice.

You will need the following ingredients:


-1lb beef, cut into chunks
-1 yellow onion
-1 green bell pepper
-1 bottle Italian dressing (zesty, creamy, whatever your preference)
-Shish kebab sticks

Absolute FIRST THING you should do is, if you have wooden shish kebab sticks, soak them. If you don't they will burn while you are grilling. Just stick them in water and don't take them out until I tell you to.

On to business.

Italian dressing is no good on salads, in my opinion. I loved it when I was younger, but now I just think it is too salty and it covers the taste of the yummy veggies. However, due to its saltiness, it does make a pretty good marinade.

So, what you're going to do is lightly, lightly salt your beef chunks and marinate them in Italian dressing. You can do this for as little as fifteen minutes or as long as all day.

Now, I personally recommend marinating for around 3-5 hours. However, you might want to tweak that time depending on the size of your beef chunks and the amount of time you actually have to make this. We left it all day with relatively small beef chunks and my husband said he would have preferred a slightly milder flavour.

As for the vegetables, chop them into large chunks (and please feel free to grill whatever vegetables you want - onions and green peppers are just my personal favourites and I don't like grilled tomatoes at all).

I recommend marinating them for a shorter time than the beef because it's more about moistening then than anything else. If you grill dry veggies they get black and crispy, which to me equals burnt. We marinated the veggies for around a half hour and they were perfect.

Okay, photo credit for the next two photos goes to my husband. While I put the baby to sleep, he kindly impaled, grilled and photographed the shish kebabs.

So, as I put it, next you should impale the meat, onions and peppers on the shish kebab sticks (note: I believe the word "shish" or şiş means "stick" in Turkish). You can either put all one ingredient on one "shish" or alternate them. My husband chose to alternate:
They should take about 12-15 minutes to cook through (longer if you don't want any pink on the inside). Turn them once about halfway through.

My husband proposes the alternate "Iranian way" which is turning them constantly. While it is more work, he says that this way the juices don't fall off.

I recommend serving your shish kebabs over rice and with a light salad. If there are leftovers, you could try stir-frying them!


Enjoy!

THIS RECIPE IS:


~~~~
Boring version of recipe instructions:

Cut beef and vegetables into large chunks and marinate in Italian dressing for desired amount of time. Not forgetting to soak wooden shish kebab sticks beforehand, put veggies and meat on sticks. Grill 12-15 minutes, turning once.