Pages

Featured Posts

Friday, June 8, 2012

Lemon Meringue Pie

Lemon meringue pie is one of three pies that I know how to make, which is a real shame because pie is my favourite dessert, so I should really learn to make more. Anyhow, this recipe is taken from allrecipes.com. I can't claim any credit for it, though I did change one small detail. It's super-yummy and my husband said that it was "perfect." High praise, indeed.

You will need the following ingredients for this recipe:

-1 cup white sugar
-2 Tbsp all-purpose flour
-3 Tbsp cornstarch
-¼ tsp salt
-1½ cups water
-2 lemon's worth of juice and zest
-2 Tbsp butter or shortening
-4 eggs
-6 additional Tbsp white sugar
-1 9-inch pie crust (I just used a store-bought kind)

Separate the eggs. They don't come in until later, but I just want to warn you that you will want to separate them. DISCARD NOTHING!

The filling is the first part. So, in a saucepan, combine the 1 cup sugar, flour, cornstarch and salt. Then stir in the water, lemon juice and lemon zest.

When you squeezed the lemons (because I know you used fresh lemons - not artificial lemon juice!), you probably noticed that some seeds came out. Maybe you tried to remove the seeds from the lemon beforehand. Maybe lemon seeds are why you used artificial lemon juice (bad!). Instead of these silly things, just squeeze the lemon juice into a bowl and pour the juice through a little strainer like so:


That way, none of the seeds (not even the tiny ones!) will get into your pie filling.

So, cook that baby at a medium-high heat. Here's the confusing part, because the original recipe says "until mixture comes to a boil" and then a few steps after it begins talking about thickening. I don't know what thickening agent that author used, but it must not have been cornstarch. Cornstarch begins thickening very, very quickly - it's not going to wait until after your mixture has come to a boil. So, go ahead and let the mixture thicken and come to a boil, but make sure you are stirring frequently. If you don't, the mixture will burn.

Stir in the butter. The original recipe calls for butter. I used shortening. Worked just fine.

So now your mixture is thickened and boiled. You are now going to address the egg yolks. So, you have your egg yolks separated. Whisk them together really quick, then add is a little bit of the lemon filling (about ½ cup total) and stir it up, then add the egg yolk mix back to the filling and stir it in really well. I love this part because it gives the filling a really rich, yummy-looking yellow colour.

Next you're going to take your nice, thickened filling off the heat and pour it into the pastry shell. A quick warning to my Jewish/Muslim/vegetarian friends out there: lots of store-bought pie crusts are made with lard. Lard=pigs! Look for a Kosher sign, such as this:


If you see that, you'll know you're safe. Because Jews don't eat pigs. Because gross.

Now, the meringue! The meringue is very simple. Place your egg whites into a medium-sized or large mixing bowl and whip them (I see them hand whip on TV, but I highly recommend an electric mixer) until they're foamy. From there, continue whipping them, adding a little sugar at a time. I usually add one Tablespoon at a time. Keep whipping until the meringue can hold its shape (more or less - I never whip it super-super stiff). Then spread it over the filling, sealing at the edges.

Cook at 350° F for twelve minutes. The meringue should be golden brown and scrumptious-looking.


Enjoy!

Friday, May 18, 2012

Quick and Easy Margherita Pizza

My dad just went to Italy recently and he informed me that a Margherita pizza is just a pizza with tomato sauce and cheese. My suspicions, however, are that he did not even have any Margherita pizza in Italy and he is just pretending to know what he is talking about. In fact, what he was thinking of was pizza marinara. Duh. Pizza Margherita or - in English - Margherita pizza (hard translation, that), is made with fresh tomatoes and basil and che- well, I won't get ahead of myself. The point it, I was right and my dad was wrong. Hah!

This recipe is as easy or as hard as you make it. You will soon see why.

You will need the following ingredients for this recipe:

-Pizza dough
-Tomato sauce
-Fresh mozzarella
-Ripe tomatoes, sliced
-Fresh basil
-A little olive oil

So, as far as the dough goes - that's really what determines the ease of the recipe. You could make it from scratch, but pizza dough takes a while to make and homemaking dough is a royal pain in the you-know-where, so, in the immortal words of every mafia gangster ever, forget about it.

My method was very easy. I bought those little frozen dough loaves from the grocery store, covered one with oil and covered it to thaw. When it rose, I had my husband cut in in half and roll it out on a floured surface, then put it in our little pizza pan. It wasn't perfect, but who even cares?

Lightly top the dough with pizza sauce. I just used a store-bought kind. Garlicky. Yum!

For best results, I urge you to use fresh mozzarella. My husband couldn't stop raving about how delicate the flavour of the fresh mozzarella was compared to that of the non-fresh variety. The packaged mozzarella you get at the store has a bunch of salt in it, which really changes the flavour. Fresh mozzarella is... well... fresh. Ours came in a little bag and it was about a handful. Just slice it up and up it on the pizza. Don't worry that there are cheese-less gaps. It will melt.

Slice the tomatoes. Add them to the pizza.

I used a small handful of fresh basil leaves. I recommend soaking them in olive oil first so they don't dry out in the oven. Place the basil leaves on the pizza. Easy.

Cook the pizza for 15-20 minutes at 425° F.

This was a small pizza, but it was sufficient for my little family of three. If you have a huge appetite or a larger family, just make more. It's so easy and I made it all within a half hour.

Enjoy!

Saturday, January 21, 2012

Super-Easy Stir-Fry

What more is there to be said about this recipe? It's super-easy and quite tasty, too! It's even vegetarian and it may be vegan, too, but I forgot to check the ingredients on the Shanghai noodles package.

Anyhow, you will need the following ingredients for this recipe:

-1 Tbsp oil
-¼ tsp sesame oil
-1.5 oz beansprouts
-1 small red pepper, thinly sliced
-1 small yellow pepper, thinly sliced
-2.5 oz (about 7) white and/or brown mushrooms, thinly sliced
-5 oz Shanghai noodles
-¼ cup sweet chili sauce
-1 Tbsp soy sauce

Now, usually I would not recommend using olive oil for the 1 Tablespoon oil because olive oil has a really distinctive flavour and it doesn't really go well with this type of cooking. However, if you're short oil (as I was when I was making this), it turns out that olive oil works just fine because the other flavours are so bold, you don't notice the olive-ness.

So, you'll be starting out with your 1 Tbsp oil and your sesame oil in a wok. Heat it up. Always make sure to heat up your oil before you cook with it.

To be honest, I did not measure out 1.5 oz beansprouts. I just took a small handful. This is not a
recipe of precision. The proportions of the peppers, mushrooms and beansprouts look like the picture on the right, here. Feel free to use that for reference, or not.

Once your oil is nice and hot, add in the peppers, mushrooms and beansprouts and stir-fry until the peppers are soft.

At our grocery store, when you buy Shanghai noodles, they come in this tiny package all squished together and it just kind of looks like one mass of noodle. If that's how it looks for you, do not fret. They do come apart. It's a bit of a pain to do and you'll want to do it before you add them to the wok. Anyhow, 5 oz is approximately of that noodle mass in the picture.


Add the noodles to the wok, as well as the sauces. Stir well and keep stir-frying until the noodles are nice and hot.

This is how your plate will look like when you're finished. This stir-fry does not mess around when it comes to yumminess.

But in the mean time...


Enjoy!

THIS RECIPE IS:


Monday, January 9, 2012

Cooking Tip: How to Care for Mushrooms

Holy moly, has it ever been a while! Well, never fear, for I am back (for now!) with another useful tip for the kitchen.

So, true or false: you buy mushrooms at the store, you pop them in the fridge in their plastic container and when you're ready to use them you take them out and eat them as they are.

If you selected "true," then you should read this post!

Mushrooms should never ever ever be stored in their original container. I was very bad and bought mushrooms the yesterday and put them in the fridge without changing the container and even in the past 24 hours, some of the mushrooms have gotten mushy in some spots.

The best environment for mushrooms is in the fridge in a brown paper bag. They need to breathe! However, they shouldn't be stored for too long because they tend to take on the odors of the fridge since they are so porous.

So, now you've taken your mushrooms out of the brown paper bag you put them in when you got home from the grocery store and you pop one in your mouth or in your stir-fry or on your pizza without batting an eyelash... right? WRONG!

Look:
See that mushroom? See those little brown spots? You may think that that's just part of the mushroom because even white mushrooms aren't perfectly white. Well, you're right about white mushrooms not being perfectly white, but not all those spots are supposed to be there! That's right, folks, some of them are....


dirt!

So, what do you do? Well, it's very simple. First you run the mushroom under cool water and rub it gently. The dirt should wash away easily. You might have to work a little harder at mushrooms you bought bulk (not American bulk, which is called "wholesale" in Canada, but Canadian bulk, which means that you picked which mushrooms you wanted and put them in the bag yourself, as opposed to the pre-packaged ones).


Then you pat the mushrooms dry with a paper towel and let them hang out with some of their mushroom buddies until you're ready to use them!

See? Easy peasy!

Saturday, October 8, 2011

My Dad's Chili Recipe

I made this chili a while back and it was really, really yummy. It's my dad's recipe and it turns out very slightly acidic due to all the tomato products, but serving it with bread remedies that. You could also add a small can of beans or omit a little bit of the tomato product.

You will need the following things for this recipe:

- 2 Tbsp oil
- 1 cup chopped onion
- 3 cloves crushed garlic
- 2 lbs ground beef
- 1 Tbsp cumin
- ½ tsp cayenne pepper
- 1 Tbsp chili powder
- 2 beef bouillon cubes
- 1 tsp paprika
- 1 tsp oregano
- ½ tsp crushed red pepper
- 28 oz crushed tomatoes
- 15 oz diced tomatoes
- 5.5 oz v8 or tomato juice
- 2 cups water
- 3 bay leaves
- 2 cups frozen corn
-1 chopped green pepper

Heat oil and sautée onions and garlic a few minutes. Add in the beef and brown.

Okay, this recipe is just ridiculously simple.

Transfer the beef mixture with a slotted spoon (or otherwise in a manner that drains the far and oil) to a slow cooker.

Add in all the rest of the ingredients.

Set slow cooker to whichever setting you prefer, depending on how far in the future you plan on eating this delicious concoction, and just wait. The beef is ground and bathing in three varieties of tomato, so it's not as though you need to worry about it getting dry.

Enjoy!
THIS RECIPE IS:

Monday, September 12, 2011

The Best Guacamole

I love guacamole. Love it. Love, love, love, love, love it! The thing is, good store-bought guacamole is hard (and expensive) to come by around these parts. The logical solution: home make guacamole.

My problem when I fist started doing that is that I didn't trust the recipes. They said "1 avocado" and I was all, "Yeah, right." So I'd end up with a guacamole that tasted like avocado and nothing else. So, even though this recipe only calls for one avocado, please trust the recipe. It isn't called "The Best" guacamole for nothing.

You will need the following ingredients for this recipe:

-1 medium to large avocado
-1 medium tomato
-1 small or ½ medium to large onion
-1 clove garlic
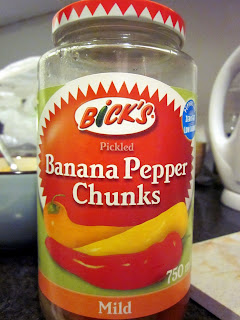
-1-2Tbsp chopped jarred banana peppers (mild or hot)
-Approximately 1Tbsp jarred banana pepper juice

Start by cutting up the avocado and smashing it with a fork in a bowl.

Dice up the tomato and onion and add them to the bowl. Next add the garlic.

Next, take your banana pepper rings or chunks and dice them up very, very finely and add them to the mix.

The secret ingredient that makes this the best guacamole ever is the banana pepper juice. It's all to taste, really, but I put a specific amount for those among us who must have a specific amount to go off of, which is fine.

Take a fork and mix all the ingredients together. Eat with tortilla chips, or whatever you prefer.


Enjoy!

THIS RECIPE IS:


Sunday, September 11, 2011

Chocolate Raspberry Ganache Over Chocolate Cake

It has been forever since I've updated, I am aware. Though I do dislike making excuses, I do feel perfectly justified in my absence seeing as I had several exams to study for and I just finished the busiest week of my life!

In any case, to make up for my absence I will present to you with a gem of baking: a chocolate cake topped with chocolate raspberry ganache. If you don't love it then you are crazy.

For the record, I have pulled my inspiration and ideas for this recipe from several different sources, but the final product is uniquely mine (minus the cake, as this recipe calls for boxed cake).

You will need the following ingredients for this recipe:

-1 box chocolate fudge cake mix, plus required ingredients for the mix
-About 18oz bittersweet chocolate - trust me, bittersweet will yield the best results
-2¼ cups heavy whipping cream
-Several tablespoons seedless raspberry jam
-Fresh raspberries
-Powdered sugar

First, bake the cake according to the instructions on the box for a layer cake - not a sheet cake. Carefully remove the cakes from the pans and let cool.

Next you'll want to prepare your chocolate. If you're using chocolate chips then you're all ready to go. If you're using chocolate squares, then chop them up. I started doing this with a Santoku knife, but my husband suggested I use a bread knife (he even chipped in on cutting up the chocolate for a few minutes!) and it was actually a lot easier.

Dump all your cut-up chocolate into a mixing bowl as pictured above right.

Now, as you probably know, melting chocolate can be a tricky business. If you burn it, it's basically wrecked and once it starts to burn it burns quickly. So, here's the method I suggest:

Dump the heavy whipping cream into a sauce pan and bring it to a boil. As soon as it comes to a boil, pour it over the chocolate and stir it up so the chocolate melts.

The perfecting of the ganache (which, by the way, is what you're in the middle of making) is extremely taste-oriented. As such, you should not make this in the middle of the day during Ramadan, just FYI. I added probably about eight heaping tablespoonfuls of the raspberry jam into mine and I got a subtle but distinct taste of raspberry in it. It turned out perfectly. But I encourage you to not go by what I say, but to go by your taste.

Try as best you can to not eat too much of the ganache. It's really rich and delicious, but if you eat too much there won't be enough of the cake, so exercise self-control if at all possible!!

Once you have acquired your desired taste of ganache, put it in the fridge for a half hour to cool. It needs to be cool so it's more easily controllable but it still needs to be somewhat runny, so don't exceed 1 hour in the fridge.

In the mean time, take one of the cooled cakes and place it upside-down on a cake tray. Spread a generous layer of the raspberry jam.

Once the ganache is cooled... well, this is where the tricky part begins. My advice to you is so spread out lots and lots of paper towels because unless you're an expert, it is going to get messy.

Dump, spoon, or somehow spread ganache over the layer of jam. It will spill all over the place, but don't worry about that too much. The ganache is supposed to get on the sides of the cake anyway, and it's easy to clean up the plate for a clean presentation. The only way you will get through this is to embrace the mess.

Once you're done with that, put the other layer on top, upside-down or right side-up. Doesn't matter. Pour the rest of the ganache over, as evenly as possible. Let it drip down the sides, but also try your best to coat the sides with the ganache.

Once you're finished, use the flat side of the knife to even and smooth out the ganache. Top with raspberries and put in the fridge for the ganache to stiffen.

Before you serve (with coffee, of course), sprinkle the cake with powdered sugar (also called superfine sugar or icing sugar).

Again, seriously, serve it with coffee.


Enjoy!

THIS RECIPE IS: